If <textarea> is not sufficient for you and you’re looking for something better, you need a rich text editor. Luckily, Vue.js has plenty of options available if you’re looking for one. One of the most popular text editor of all times is the CKEditor. The library has had multiple versions and iterations over the span of past years. Although using the editor is tad simple, having to implement it for the first time could be a bit tricky. Here in this guide, I’m going to show you how to get it running in your Vue.js application.
Fire up your terminal and run the following commands to install the required libraries:
npm install --save @ckeditor/ckeditor5-vue2 @ckeditor/ckeditor5-build-classicCode language: CSS (css)Note: If you get any errors like “duplicate modules found”, install the libraries one by one.
Next up, open your main.js or app.js (whichever file boots your app) and make the modifications as follows:
import Vue from "vue";
import App from "./App.vue";
import CKEditor from "@ckeditor/ckeditor5-vue2";

Vue.config.productionTip = false;
Vue.use(CKEditor);

new Vue({
  render: (h) => h(App)
}).$mount("#app");
Code language: JavaScript (javascript)
You’d notice that I’ve registered Vue to use CKEditor on line number 6. Moving on to the component where you’d need to actually use the editor:
<template>
  <div id="app">
    <div class="np-credits">www.nightprogrammer.com</div>
    <div @click="saveData()" v-if="editorData" class="np-save-btn">Save</div>
    <div @click="clearData()" v-if="editorData" class="np-save-btn">Clear</div>

    <div style="height: auto">
      <ckeditor
        :editor="editor"
        v-model="editorData"
        :config="editorConfig"
      ></ckeditor>
    </div>
    <div v-if="dataToSave">
      <h4>Parsed data:</h4>
      {{ dataToSave }}
    </div>
  </div>
</template>

<script>
import ClassicEditor from "@ckeditor/ckeditor5-build-classic";

export default {
  name: "App",
  data() {
    return {
      editor: ClassicEditor,
      editorData: "",
      editorConfig: {
        // todo confg
      },
      dataToSave: "",
    };
  },
  methods: {
    saveData() {
      this.dataToSave = this.editorData;
    },
    clearData() {
      this.dataToSave = this.editorData = "";
    },
  },
};
</script>

<style>
#app {
  font-family: "Avenir", Helvetica, Arial, sans-serif;
  -webkit-font-smoothing: antialiased;
  -moz-osx-font-smoothing: grayscale;
}
.np-credits {
  font-size: 12px;
  margin-bottom: 12px;
}
.np-save-btn {
  background: #eee;
  border-radius: 4px;
  padding: 2px;
  width: 100px;
  text-align: center;
  margin-bottom: 10px;
  cursor: pointer;
}
</style>
Code language: HTML, XML (xml)
On line 22, I’ve imported ClassicEditor and used it as the editor initiator on line 28. Line 29 has the default editor data. On line 30, you can set some editor configurations, I’ve kept it blank. Then I’ve created two methods saveData() and clearData() on lines 37 and 40 respectively. saveData() renders the parsed data (HTML) on the browser, I’ve done so on line 14. clearData() clears all the data, including the editor as well as saved data.
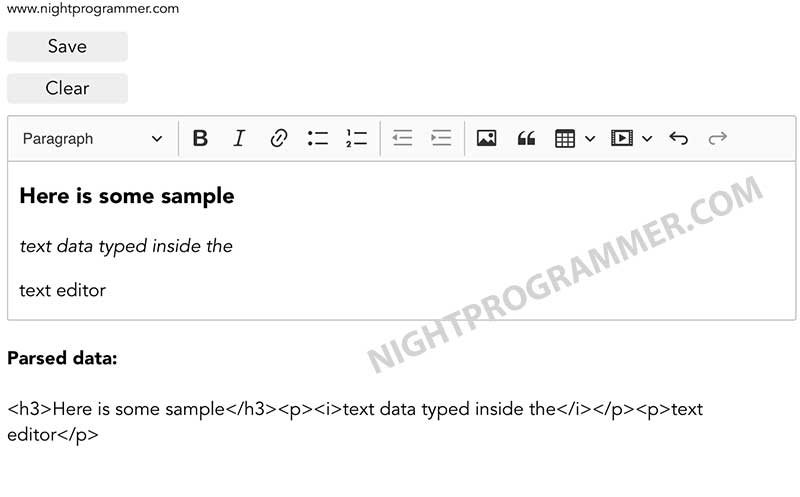
If did everything right, here’s how it should look like:

And of course, you can grab a working version of the above code from our repos:

