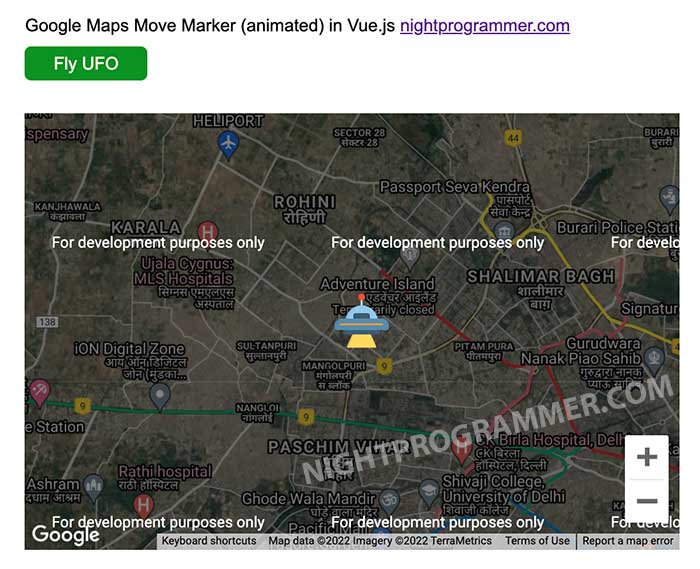
Translating a Google Maps Marker can be handful, since Google Maps API doesn’t provide any option to do that. However, there are alternative ways to do that programatically. This idea of translation is based on the fact that you can change the coordinates of the marker, within a finite time. The more coordinates you have between every two recognisable points, the smoother your animation will look like.
Here I’m illustrating the idea by moving an UFO (marker).
First, you’d need to install loadGoogleMapsApi as follows:
npm install load-google-maps-api --save
Then, here I’m writing the script required for the animation:
import loadGoogleMapsApi from "load-google-maps-api";
import { gMapsApiKey } from "./../constans";

export default {
  name: "AnimatedMarkerMap",
  data() {
    return {
      map: null,
      marker: null,
      defaultLatitude: 28.7,
      defaultLongitude: 77.1,
    };
  },
  mounted() {
    loadGoogleMapsApi({
      key: gMapsApiKey,
      libraries: ["places", "geometry"],
    }).then(async () => {
      const mapZoom = 12;
      const { google } = window;
      const mapOptions = {
        zoom: mapZoom,
        mapTypeId: google.maps.MapTypeId.HYBRID,
        center: new google.maps.LatLng({
          lat: this.defaultLatitude,
          lng: this.defaultLongitude,
        }),
        mapTypeControl: true,
        streetViewControl: false,
        mapTypeControlOptions: {
          position: google.maps.ControlPosition.BOTTOM_LEFT,
        },
      };
      this.map = new google.maps.Map(
        document.getElementById("animated-marker-map"),
        mapOptions
      );

      const newIcon = {
        url: "http://svgur.com/i/dG2.svg",
        anchor: new google.maps.Point(25, 50),
        scaledSize: new google.maps.Size(50, 50),
      };

      this.marker = new google.maps.Marker({
        position: this.map.getCenter(),
        map: this.map,
        icon: newIcon,
      });
    });
  },
  methods: {
    sleep(milliseconds) {
      return new Promise((resolve) => setTimeout(resolve, milliseconds));
    },
    async moveMarker() {
      const { google } = window;

      let defaultLat = this.defaultLatitude;
      let defaultLng = this.defaultLongitude;
      let currentPosition = new google.maps.LatLng({
        lat: defaultLat,
        lng: defaultLng,
      });

      for (let i = 0; i < 1000; i++) {
        await this.sleep(10);
        if (i > 750) {
          defaultLng += 0.0001;
          defaultLat -= 0.0001;
        } else if (i > 500) {
          defaultLng -= 0.0001;
          defaultLat -= 0.0001;
        } else if (i > 250) {
          defaultLng += 0.0001;
          defaultLat -= 0.0001;
        } else {
          defaultLng -= 0.0001;
          defaultLat -= 0.0001;
        }
        currentPosition = new google.maps.LatLng({
          lat: defaultLat,
          lng: defaultLng,
        });
        this.marker.setPosition(currentPosition);
        this.map.setCenter(currentPosition);
      }
    },
  },
};
Code language: JavaScript (javascript)
Let me explain the code by the important line numbers:
1. I’ve imported the load-google-maps-api to load Google Maps functionalities into the Vue environment
2. I’ve imported the API key from a constants file (required for making Google Maps requests)
34: Initialised the marker
39: Used an SVG UFO icon as a marker
56: moveMarker() method gets called whenever you hit the “Fly UFO” button. As you can see on line 67, I’m making the for loop wait for every 10 milliseconds before its next iteration. That way, you could see the marker moving.
68: Here I’ve divided 1000 (loop count) into 4 parts (250 each), and declared different directions for the marker position. I did the same by changing the values of latitude and longitudes.
Here’s the template code (renderable HTML) for the button and the map:
<template>
  <div>
    <div class="header-margins">
      Google Maps Move Marker (animated) in Vue.js
      <a target="_blank" href="nightprogrammer.com">nightprogrammer.com</a>
    </div>
    <div @click="moveMarker()" class="np-button">Fly UFO</div>
    <div id="animated-marker-map" class="map-margins"></div>
  </div>
</template>
Code language: HTML, XML (xml)
And at the bottom of the file, I’ve written some CSS to style the used elements:
<style scoped>
.header-margins {
  margin-left: 40px;
  margin-top: 20px;
}

.map-margins {
  height: 400px;
  width: 600px;
  margin: 30px 40px;
}

.np-button {
  margin: 10px 40px;
  width: 100px;
  background: rgb(12, 147, 34);
  color: #fff;
  border-radius: 6px;
  text-align: center;
  padding: 6px 6px;
  transition: all 0.3s;
  cursor: pointer;
}
.np-button:hover {
  background: rgb(5, 84, 18);
  transition: all 0.3s;
}
</style>
Code language: HTML, XML (xml)
Here’s how the view should be rendered like:

You can grab a copy of the source code from my repos below:
