One of the best ways to enhance your Vue.js skills, is by trying to imitate interfaces already used by renowned companies. Since those interfaces have been tried and tested by millions of users, they tend to provide good user experience. Most of the Vue.js frameworks support cross-platform development as well. That means, learning to architect a mobile interface can help in both ways.
Here, In this tutorial, I’m going to show you how to create a basic WhatsApp chat interface with just 150 lines of Vue.js code!
Project setup and requirements
Run the following command on your Terminal or Command promt window to create your basic Vue project:
npm install -g @vue/cliCode language: CSS (css)After that, the only library you’d need is moment.js (to use some data conversion functions):
npm install moment --saveNow you’re all set to begin.
I’m writing the basic workflow logic in the mounted App.vue (root component) as follows:
<template>
  <div id="app">
    <div class="np-chat-container">
      <div class="np-chat-container--holder">
        <div
          v-for="(chat, chatIndex) in chatHistory"
          :key="chatIndex"
          style="position: relative"
        >
          <div
            v-bind:class="[
              chatIndex % 2 == 0
                ? 'np-chat--text np-chat--text_sent'
                : 'np-chat--text np-chat--text_received',
            ]"
          >
            <span class="np-chat--time"
              >{{ getChatTimeLocal(chat.time) }}:</span
            >
            {{ chat.message }}
          </div>
        </div>
      </div>
      <div class="np-input-text--value_holder">
        <input
          class="np-input-text--value"
          type="text"
          placeholder="Type and enter to send"
          v-model="originalUserInputValueObservable"
          @keyup.enter="insertIntoList()"
        />
        <div class="np-input-text--button" @click="insertIntoList()">Send</div>
      </div>
    </div>
  </div>
</template>

<script>
import moment from "moment";
export default {
  name: "App",
  data() {
    return {
      chatHistory: [
        {
          message: "Hi, this is Shruti from nightprogrammer.com!",
          time: new Date() ? new Date() : null,
        },
      ],
      originalUserInputValueObservable: null,
    };
  },
  beforeDestroy() {
    this.resetToInitialStates();
  },
  beforeCreate() {
    this.resetToInitialStates();
  },
  methods: {
    insertIntoList() {
      if (this.originalUserInputValueObservable) {
        this.chatHistory.push({
          message: this.originalUserInputValueObservable,
          time: new Date(),
        });
        this.originalUserInputValueObservable = null;
      }
    },
    resetToInitialStates() {
      this.chatHistory = [];
      this.originalUserInputValueObservable = null;
    },
    getChatTimeLocal(originalChatTime) {
      return moment.utc(originalChatTime).local().format("hh:mm:a");
    },
  },
};
</script>
Code language: HTML, XML (xml)
And that’s it! You’re done for the functional part. You’d also need a bit of CSS for the styling, which I’ve added below. Now let’s try to have a look at what I did:
Steps explanation
I’ve initiated a local state chatHistory with a sample message and a timestamp. I’ve initialized the current time as the time when the message is initialized. I’m also using originalUserInputValueObservable as the active keyboard input state of the user. I’ve then pushed the typed information into the chatHistory local state whenever the Enter key is pressed. Or the Send button is pressed.
Through line 5, I’ve iterated over all the chatHistory list data. All the even count data would appear on the left of the screen and the odd on the right. I’ve done that by dynamically binding CSS classes np-chat–text_received and np-chat–text_sent
<style>
#app {
  font-family: "Avenir", Helvetica, Arial, sans-serif;
  -webkit-font-smoothing: antialiased;
  -moz-osx-font-smoothing: grayscale;
}
.np-chat-container {
  width: 300px;
  height: 500px;
  position: relative;
  border: 1px solid #000000;
  padding: 12px;
  background: #080b10;
}
.np-chat-container--holder {
  height: 500px;
  overflow-y: auto;
}
.np-chat--text {
  width: 200px;
  font-size: 12px;
  letter-spacing: 0.4px;
  background: #eee;
  word-break: keep-all;
  margin: 4px 6px;
  padding: 6px 10px;
  border-radius: 6px;
  color: #fff;
  line-height: 1.4;
}
.np-chat--time {
  opacity: 0.7;
}
.np-chat--text_received {
  background: #005d4b;
  float: right;
}
.np-chat--text_sent {
  background: #1f2c34;
  float: left;
}
.np-input-text--value_holder {
  position: absolute;
  background: #080b10;
  width: 300px;
  height: 50px;
  bottom: 0px;
}
.np-input-text--value {
  padding: 6px 4px;
  width: 220px;
  font-size: 14px;
  background: #1f2c34;
  border: 1px solid #1f2c34;
  border-radius: 30px;
  color: rgb(255, 255, 255);
  outline: none;
  transform: translateY(6px);
}
.np-input-text--button {
  color: #fff;
  position: absolute;
  right: 12px;
  top: 12px;
  cursor: pointer;
}
</style>
Code language: HTML, XML (xml)
And here’s the package.json file content of the project:
{
  "name": "vue",
  "version": "0.1.0",
  "private": true,
  "scripts": {
    "serve": "vue-cli-service serve",
    "build": "vue-cli-service build",
    "lint": "vue-cli-service lint"
  },
  "dependencies": {
    "@vue/cli-plugin-babel": "4.1.1",
    "moment": "2.29.1",
    "vue": "^2.6.11"
  },
  "devDependencies": {
    "@vue/cli-plugin-eslint": "4.1.1",
    "@vue/cli-service": "4.1.1",
    "babel-eslint": "^10.0.3",
    "eslint": "^6.7.2",
    "eslint-plugin-vue": "^6.0.1",
    "vue-template-compiler": "^2.6.11"
  },
  "eslintConfig": {
    "root": true,
    "env": {
      "node": true
    },
    "extends": [
      "plugin:vue/essential",
      "eslint:recommended"
    ],
    "rules": {},
    "parserOptions": {
      "parser": "babel-eslint"
    }
  },
  "postcss": {
    "plugins": {
      "autoprefixer": {}
    }
  },
  "browserslist": [
    "> 1%",
    "last 2 versions",
    "not ie <= 8"
  ],
  "keywords": [
    "vue",
    "vuejs",
    "starter"
  ],
  "description": "Vue.js whatsapp chat interface"
}
Code language: JSON / JSON with Comments (json)
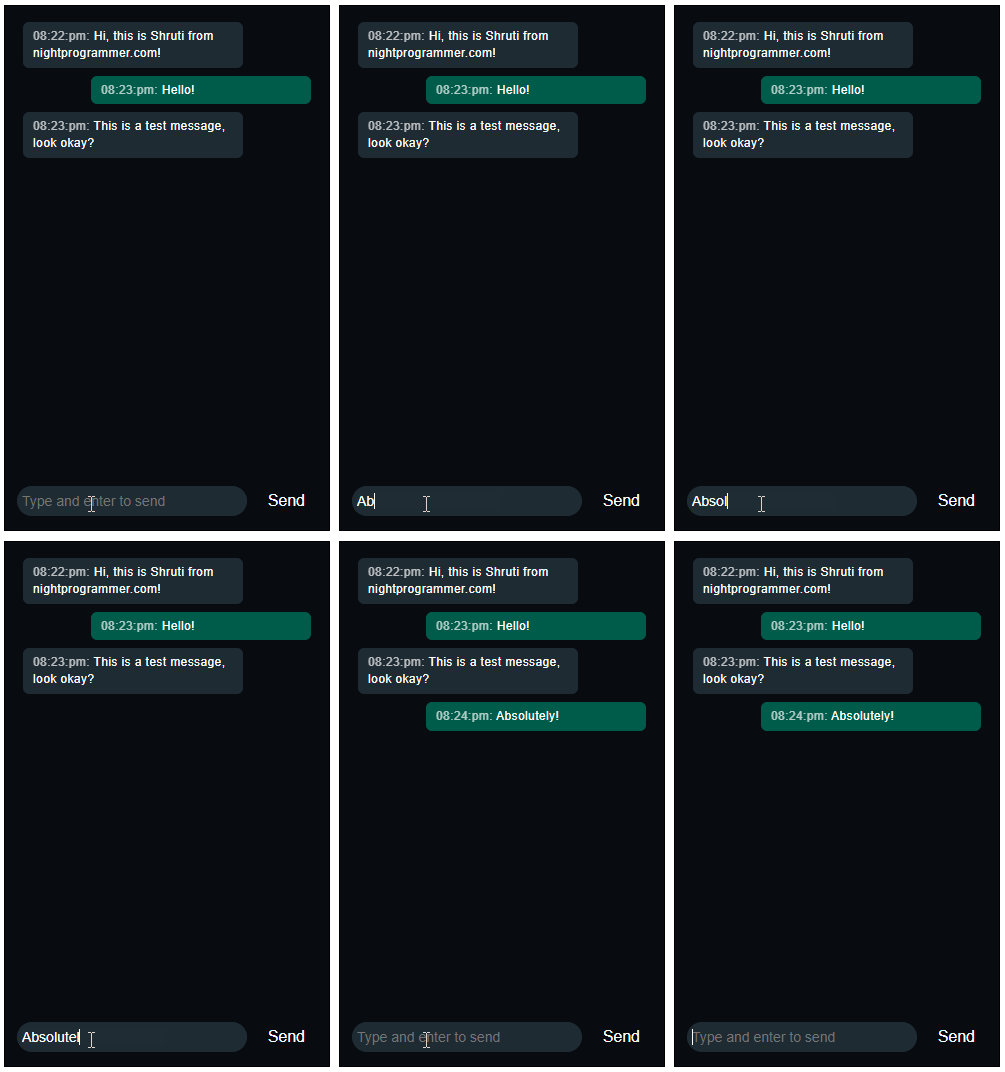
Here’s how the chat interface is going to look like:

You can find a fully working version from the repos here:

Just wow! I’m an Angular developer and doing React for quite sometime. But this is just amazing, to think how much you can achieve with so little code! Doing this with Angular or React would’ve taken more code for sure. Do you have a link to Github for this btw?
Thanks Zaman, glad you liked it ? .. The GitHub link is at the bottom of the article.
Great work. May I share this on our Instagram page (we’ll credit your link)?
Sure!