Wondering what is the best way to structure your Vue.js application so that it remains maintainable and extendable? The answer to that lies in modularity and predictability. You’d think that Vue is all about module based components and state management. However, it is much more than that. It is very powerful by performance (beats React by benchmarks). And the way you structure your project can make a lot of difference. You’ll find numerous articles and examples over the web on this. However, most of them will only show a flat styled directory structure without explaining how they communicate with each other. Or how you’ll need to scaffold it as your project grows rapidly.
I’ve tried and tested multiple structures over time, with different (large scale) projects. And have come to the conclusion that every project demands a different kind of structure depending on the project requirements. The degree of differentiation, of course, varies. There’s no ideal project structure that can fit in any project you throw in it. The diversity in project structure increases with the project size. Which means, you’ll eventually need to make slight changes to your project structure as it grows. However, if you understand how to architect your project from the get-go so that you won’t need to make breaking changes, your project structure will remain maintainable and extendible.
Atomic design
There are multiple design patterns available across the web. There’s one that stands out to me. The atomic design pattern by Brad Frost. Although, the main idea behind the system is pretty old by now. But, most of it is largely applicable when building a component based system at a large scale. I won’t be explaining the complete guideline provided by atomic design here, as it’s beyond the scope of this article. I will, however, be showing an architectural implementation using the application part of the guideline.
Other than the design system, a framework definitely help you kickstart your project with tons of ready-to-use components out of the box. There are multiple popular Vue.js frameworks, like Vuetify, Quasar or Buefy. The architecture I’m going to explain here is applicable to all the Vue frameworks if you choose to use one.
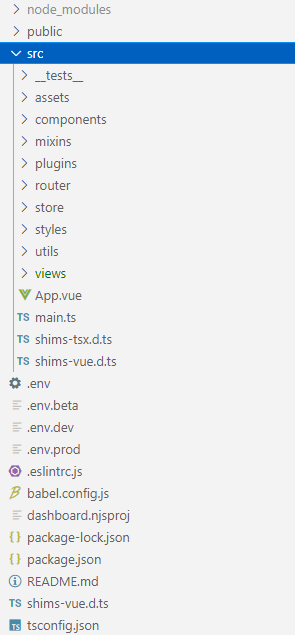
Here I’m showing you the most condensed form of the structure. We’ll go through each of the module and see how they extend further.
Project structure example

Tests
Here you can write all the tests for your project. You’ll notice that I’ve used double underscores before and after the directory name. This is a convention some developers prefer to keep the tests directory at the top of hierarchy. You can use your favourite testing library (Jest, Mocha, etc). Personally I use vue-test-utils (official testing library provided by Vue.js).
Assets
You can keep all your static assets like images, SVGs, sprites here. However, if there’s an SVG in which you can pass a text or a numeric value through props, it is not a static anymore. You want to keep those assets inside the components directory instead.
Components
This is probably one of the most important module of your project. As it provides the building blocks of your application. This is also a module where you can apply the atomic design idea. Let me tell you what that is in brief, here:
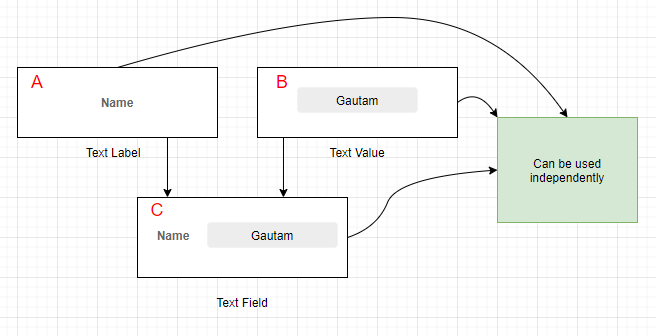
Keep in mind that rules of chemistry do not exactly apply here, but some of it do. Consider there is an atom A, and there is an atom B. We can use the atom A wherever we want, same with atom B. We can also combine atom A and atom B and create a new molecule C. It is important to understand here that molecule C will now have the properties of both atom A and B but, A and B can still function on their own as earlier. We can now use this C molecule wherever we want. Again, this C molecule can further combine with other atoms or molecules to give other derivatives.
Here, I’ve created a diagram to help you visualize the idea:

In the above diagram, there is a text label component named A. There is also a text value component named B. We can combine these two components to create a text field component named C. All of these components can be used independently as well. This is only one example of component based atomic design system. This is applicable to a large part of your project. Now, let me show you how you can structure your component directory:

This screenshot is only a part of the components I’ve created, as it is a long list. You’ll notice that I’ve created many of the components using the atomic design idea. Whenever I find that there are multiple components sharing more than one properties (props), I categorize them into sub-folders (maintaining modularity). You can see the same in case of loaders-progressive and loaders-skeleton folders above.
Mixins

Mixins can help you save a lot of repetitive coding. Whenever you find that there are operations that are being repeated at multiple places, create a mixin for it instead. Then use the mixin inside the components wherever you feel necessary. One of the more frequently mixins I use is the permissions mixin. It handles which components should be shown to the logged in user (by user role) and which should be hidden.
Router
Usually, I keep a single router file, and bind them with the views (pages). However, with increasing project size, you can consider breaking down the router file into more smaller files (by modules). You can then import them into the main index or router file. Here’s a tabular example on how you can map the components for each of the module:
| View / Component name | Route URL | Description |
|---|---|---|
| ProductList | /products | Show list of products |
| ProductAdd | /products/create | Add a new product |
| ProductEdit | /products/:id/edit | Edit a product |
| ProductView | /products/:id | View a product |
Store
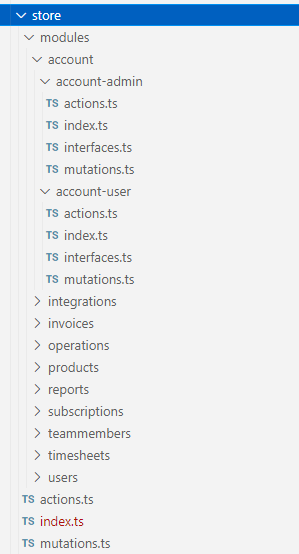
Having a state management library is a must-have tool for any large application. And Vuex is the go-to state manager for Vue.js. Here’s a snapshot of how I structure my store modules:

In the above snapshot, you’d notice that I’ve broken down the store modules further into other sub-modules as in account-admin. Here’s a diagram to show how exactly that works:

As you can see diagrammatically, each of the store module is composed of four files:
import requests from '@/utils/requests';
import { apiProducts } from '@/utils/apiurls';

export const actions = {
    async getProductsList({ commit }) {
        const url = apiProducts;
        const result = await requests.getData(url);
        if (result) {
            commit('setProductsList', result)
        }
    },
    async getProductDetails({ commit }, id) {
        const url = apiProducts + '/' + id;
        const result = await requests.getData(url);
        if (result) {
            commit('setProductDetails', result)
        }
    },
}
Code language: JavaScript (javascript)export const state = {
productsList: [],
productDetails: null
}
export const getters = {
productsList: state => state.productsList,
productDetails: state => state.productDetails
}
export const mutations = {
setProductsList(state, data) {
data.map((product) => state.productsList.push(product));
},
setProductDetails(state, data) {
state.productDetails = data;
}
}
Code language: JavaScript (javascript)index: Here you can import state, getters and mutations from the mutations file and export it. You also import actions from the actions file and export it.
import { state, getters, mutations } from './mutations';
import { actions } from './actions';


export default ({
    state,
    mutations,
    getters,
    actions,
});
Code language: JavaScript (javascript)interfaces: If you use TypeScript (as I do), you can declare all the interfaces you need in that particular module, here.
export interface IproductType {
    id: string,
    type: number
}

export interface IproductInterface {
    id: string,
    title: string,
    unit: string,
    cost: number,
    type: IproductInterface
}
Code language: CSS (css)
After you’ve structured each of your module this way, you can then import all the modules with their names in the main index file of the Vuex store. This is how your main index of the Vuex store may look like:
import Vue from "vue";
import Vuex from "vuex";
import { state, getters, mutations } from './mutations';
import { actions } from './actions';
import productsModule from '@/store/modules/products/index';
import accountModule from '@/store/modules/account/index';
// other module imports

Vue.use(Vuex);

export default new Vuex.Store({
    state,
    mutations,
    getters,
    actions,
    modules: {
        productsModule,
        accountModule,
        // other modules
    }
});
Code language: JavaScript (javascript)
Views

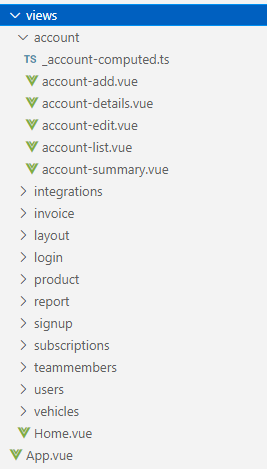
Views are basically the pages which you can directly map with each of the routes. You can create a view by using one or more components. The main views for most of the modules are often list, add, view, and update. I like to keep the nomenclature as <parent-name><child-name><child-child-name> and so on. You will also see that I have a file named _account-computed.ts. This is where I keep all the getters and setters for that module (account). With a huge extendible project, you’ll soon find yourself scrolling endlessly to use getters and setters otherwise. Here’s a sample code of that file:
export default {
    name: 'accountComputedMixin',
    computed: {
        accountDetails: {
            get() {
                return this.$store.getters.accountDetails
            },
            set(newVal) {
                this.$store.state.accountModule.accountDetails = newVal
            }
        },
        accountsLinked: {
            get() {
                return this.$store.getters.accountsLinked
            },
            set(newVal) {
                this.$store.state.accountModule.accountsLinked = newVal
            }
        },
        // other getters and setters
    }
}
Code language: JavaScript (javascript)
You can then import this file as a mixin in whichever vue component you want to use it.
Utils

It’s impossible to work on a large app rapidly, without having sufficient utility library and methods. These are some of the few utility files I create in almost every Vue project. Let’s have a look at each of them one by one:
apiurls: This is where you can keep all your API endpoint URLs. This saves the hassle of having to change endpoints everywhere in your Vue project whenever there’s an endpoint change.
//account
export const apiAccount = '/account';
export const apiLogin = `/${apiAccount}/access/authorize`;
export const apiRefreshToken = `/${apiAccount}/access/renew`;
export const apiPasswordReset = '/account/access/reset';

// users
export const apiUsers = '/users';

// products
export const apiProducts = '/products';

// others
Code language: JavaScript (javascript)constants: The name says it all. This is where you keep all the constants. Here’s a sample:
export const clientType = "ehbihSDFSDFSDFw";
export const gMapsApiKey = "AIzaSyCdlSDFSDFSDFSDF";
export const defaultLatitude = '53.95';
export const defaultLongitude = '-1.08';
export const defaultBusinessLatitudeConstant = 53.95;
export const defaultBusinessLongitudeConstant = -1.08;
export const defaultMapZoom = 12;
export const defaultPageOffsetSize = 0;
export const defaultPageLimitSize = 100;
//and more
Code language: JavaScript (javascript)helpers: You can define all the most required utility functions here. For instance, date time formatter, date time convertor (UTC), floating point number with fixed decimal points, regex validators, save cookie, get cookie, log information, etc.
requests: This is where you write the CRUD methods (GET, POST, PUT, DELETE, etc) using axios for all the asynchronous API calls you to make from the actions file. I’ll write a separate article on this.
strings: Here you can keep all the strings used in the project. Import the string constants wherever you need in the project. This will help you maintain the DRY principle as in case of constants, whenever there is a repetitive usage. Here’s a sample code:
// products
export const deleteProductWarning = 'Are you sure you want to delete this product?';
export const productCreated = 'New product added successfully';
export const productNotCreated = 'Failed to add new product';
export const productNotUpdated = 'Failed to update product';
export const productUpdated = 'Product updated Successfully';
export const productDeleted = 'Product deleted Successfully';
export const productNotDeleted = 'Product not deleted';
export const productZeroStateHeading = 'You do not have any products';
export const productZeroState = 'Click on the "add product" button to start creating new product.';
export const productListDisabled = "You're not allowed to view the product list.";
Code language: JavaScript (javascript)uiconstants: This is where you can keep all the user interface related constants like the maximum height of some list or the success message box color of some notification.
export const successColor = '#182879';
export const failureColor = '#e65a5a';
export const brandColor = '#182879';

export const defaultScrollViewHeight = 700;
export const defaultListViewVH = 0.75;
export const defaultMaxAlertBoxWidth = 400;
export const defaultMaxAlertBoxHeight = 300;
Code language: JavaScript (javascript)
Note: I’ll update this article with ways to architect your scss/less styles.
If this post helped you learn something new, or there’s something you can suggest better, sound off in the comments below!

Hello Gautam, your article is good but kindly add github repository link.
Hi Prashant,
Thanks for the read. It’ll take me a while to share the structure on Git (expect a few days), as I’ll have to remove all the contents/links of any 3rd party libraries/assets which might lead to violation of privacy policies. If you don’t want to wait, you could generate a project using “@vue/cli” and use “vue create project-name” to generate the basic boilerplates. Once done, you could follow along the article as this article is an extended / enhanced version of the structure provided by @vue/cli.
Hello Gautam, kindly add github repository link.
Hi, thanks for the amazing article! I’m working on an e-commerce project ,and we’re using Element Ui. So far everything’s good but with increasing number of products, I think I’ll probably need a better structure soon. I got the folder structure generated by Vue CLI, do u think it’s enough for future scalability? Or should I start implementing the structure followed by u?
Hello Shefali, thanks for the read. It’s possible to scale a project on any given structure. However, what differs is the amount of time taken by developers to maintain those projects. The more modular, atomic your project structure is, the easier it will be to maintain it in the long run. The more your code base grows, the more you’ll start seeing the benefits. And for E-commerce apps, an extendible structure is highly recommended. While the template generated by Vue CLI is good enough for small-medium scale apps, I’d definitely recommend you to take a step ahead and breakdown the directories in a modular and reusable way.
Thanks for the amazing article! Will definitely try this structure, I’m waiting for the CSS structure
Splendid structure! Will definitely try to implement it in my next Vue project.