With the increased amount of user data, there comes a need for a tool to analyze such data. And for analyzing data, there is no better option than data visualization. Microsoft solves this problem at a large scale by using Power BI. In this tutorial, we’ll have a look at how we can integrate and use dashboard reports from Power BI in our Vue.js app.
There are multiple ways to integrate Power BI dashboards in a Vue.js application.
Even Microsoft has recently launched a Power BI client for Vue 3. However, I wouldn’t recommend using it at this point for 3 particular reasons:
- This library is still very new and at the time of writing this article, there are only ~200 weekly downloads on NPM. Anything with such a low download rate questions long-term reliability. Although I’m positive these numbers would shoot up in the near future, as it is on rise already. However, I’d wait for it to be more stable.
- It is targeted at Vue 3 only. It doesn’t work even if we use the Composition API plugin for Vue 2.x (which it heavily depends on). Many of us might still be on Vue 2.x because of multiple reasons (like UI libraries with no Vue 3 support).
- A pure JavaScript variant would be preferable because that wouldn’t rely on the dependency of fellow framework versions.
Luckily, we also have a JavaScript client available on NPM to leverage the tool. Let’s have a look at how we can integrate Power BI using that with some tweaks.
Project setup
First of all, run the following command in your project directory to install the Microsoft Power BI Client:
npm install powerbi-clientOnce installed, we can now use the library.
Create a template with the following code:
<template>
    <div>
        <section id="container" style="height: 750px" />
    </div>
</template>
Code language: HTML, XML (xml)
We need an identifier on our DOM where we can inject the Microsoft Power BI dashboard.
Next up, here’s the script code we need to render the dashboard report. I’d explain the code in a bit:
<script>
import * as pbi from "powerbi-client";
export default {
data() {
return {
embedUrl: null,
accessToken: null,
sampleReportUrl: 'https://playgroundbe-bck-1.azurewebsites.net/Reports/SampleReport'
}
},
methods: {
async initializePowerBI() {
const sampleReportUrl = this.sampleReportUrl;
const reportConfigResponse = await fetch(sampleReportUrl);
if (!reportConfigResponse.ok) {
console.error('Failed to fetch config for report.');
console.error('Status:', reportConfigResponse.status, reportConfigResponse.statusText)
return;
}
const reportConfig = await reportConfigResponse.json();
console.log('The access token is set. Loading the Power BI report');
this.embedUrl = reportConfig.EmbedUrl;
this.accessToken = reportConfig.EmbedToken.Token;
},
},
mounted() {
this.initializePowerBI().then(() => {
const permissions = pbi.models.Permissions.All;
const config = {
type: 'report',
tokenType: pbi.models.TokenType.Embed,
accessToken: this.accessToken,
embedUrl: this.embedUrl,
pageView: 'fitToWidth',
permissions: permissions,
};
let powerbi = new pbi.service.Service(
pbi.factories.hpmFactory,
pbi.factories.wpmpFactory,
pbi.factories.routerFactory
);
const dashboardContainer = document.getElementById('container');
const dashboard = powerbi.embed(dashboardContainer, config);
dashboard.off("loaded");
dashboard.off("rendered");
dashboard.on("error", function () {
this.dashboard.off("error");
});
})
}
}
</script>
Code language: HTML, XML (xml)In the above code, we first import the library as pbi on line 2. We then declare 3 reactive states in the data property:
- embedUrl: The report config URL
- accessToken: The accessToken we receive from reportConfig.EmbedToken.Token
- sampleReportUrl: This is a sample URL from Microsoft. We can change it to our actual report URL from the Power BI admin settings.
Then when we mount the component, we first initialize the Power BI with the method initializePowerBI().
We fetch an API call for the sample report on line 16.
The response we get would look something like this:
{
    "Id": "f6bfd646-b718-44dc-a378-b73e6b528204",
    "EmbedUrl": "https://app.powerbi.com/reportEmbed?reportId=f6bfd646-b718-44dc-a378-b73e6b528204&groupId=be8908da-da25-452e-b220-163f52476cdd&w=2&config=eyJjbHVzdGVyVXJsIjoiaHR0cHM6Ly9XQUJJLVVTLU5PUlRILUNFTlRSQUwtcmVkaXJlY3QuYW5hbHlzaXMud2luZG93cy5uZXQiLCJlbWJlZEZlYXR1cmVzIjp7Im1vZGVybkVtYmVkIjp0cnVlLCJ1c2FnZU1ldHJpY3NWTmV4dCI6dHJ1ZSwic2tpcFF1ZXJ5RGF0YVNhYVNFbWJlZCI6dHJ1ZSwic2tpcFF1ZXJ5RGF0YVBhYVNFbWJlZCI6dHJ1ZSwic2tpcFF1ZXJ5RGF0YUV4cG9ydFRvIjp0cnVlfX0%3d",
    "Type": "report",
    "EmbedToken": {
        "Token": "H4sIAAAAAAAEAB2WxwrsCBZD_-Vt3eDssht64Zxz9s45lnMe5t-nevaCCwdJV__5Y6XPMKXFn7__xO2FQPkt8AtwtnRxK4X4wFXcStMXk46jvlDGpEBrpBzMd8RipbHQXEfVqzdKgk0xsvFylAntUXI5Ul-iBjBAGxe3eJQr4qZsGSixXkWPvo5q0NEulWSrUJtwAd5HJG9s7FRM0jl228Cznwl4vHx7OTQAJ-v4mZlJzXAYmXS4UBLbAs3HBJqTiRObOyfnYwW28IkklGWAVno_-VaVXKaL1y3RMmVdwSkzRK_DxH5XuWNi8k3MQ-kPDKKF0UhQ8-PWnedEJ8SxBZZyFiDwOmlhwvHFZVzleG7HuzJ5LHnEctZYt_PG8_5Al6GGRa9du1xpD1oJ7xmW_JaP0Aohu2yusHAXIHcSFYFaVEiQntBtts5Qu20E9HTW8FlY6vwrzfXXy79mHaUHoKgA2jEtotlCtyZ8Dx8dc4_8TlettRX-W87q5IgaUOpPBaRa_bwD4kisqhy2sIhRWNzd8FDF3AHVNnw6PvtSIT0IaXMqZsIAOZfaXftN6KO6u9R-PqXhAr7tCACNIBZLQqD5Te2kcH1xXlhy4_iSsdQpKj9ECTSKD-ObceDIG24qPwqdOLQjsw8crir917gd0NVjLt0VugkOq-bDTflwYUmnxYekR7HTDWxI9CEL1zrN-5OQB_Vt28wqSzUoSpajLxWjJkYiIeXoJl3vaEdCn2RV1qqEgc2ueQ17JfCAZOMu_MygTjaCgZQwnoegKJDsPDsjLaKL6M9tEpGvoug7WW2W1da3J5zpwubJdxI_-S7XKmH-aJfWZT2xvyXOnV_5beaQv6RXkBt50LFRZjl-kxkncaPzMou_CCBVvIgx4uewNXmfo-bbh0xB00PW4rjnq1xkcgxaBaLSHw1J5q7mCc_jBEJNI15dK22GYNT1eIFnhORgkm9pExwi8DwhN_zgycZ7M5WDIP3GbWQejen3MNCbwMgjAtqZ3cIx-sXLn5cGx-V1Wlj3pLon1of-Azgt37DiioM7UeuBoKaF6H7VEcvcIGYD1EDyhzTJsV4hldWi4KsG4_k87DJet5K1PRycIw9Bk0ZE-XIIWJsZklInYEj2d9yomSeBNykgMUxzmquZF6DEs6ikuHYe6BthcyEhrQvtyX4QmpCH2rBeOyylVkN74TiD7uu-8spZiximo73lSbMs9i7TEqwms411MLNAAOzimq0V9XggMcsQedCw9_bgbPK2YWt_IRTjv91Vy6Ne7_ZdLhuOR_meuzjAb97bmBEu1MgOxqIYlbkhw1fkr7KDA9Tgv_N4P6xhVNdYVaXBxTXgY6JFXHy0dlbORfHFP9BTg051q9DqTEVVazrdiS0yrSbFAQavYxcSOR-CEXJChvhQyhrpvg80vmzBXE_Oxgp8-245Gzf4KC4cN8c8TIzt8dGXwj6CLG6QfQQFauML6vE8dBRwfpW9gbZnJIYWSJOdhs8VmspPy2pJmVoXOiYJaRGV9vWQY6g4XwNUgzbj6Xvo0DgH2U2R4C2FY0pAot6iRFfQo0L2kfyrjSGAi6VTqTbBksfhXX5QdZZVNJ89VvO20cxiLz2JNpDbKuldaPuuqWb5uG5PMJOgdZ4R23VukTcwb4G-I0-YmeD2xhEb6Mt1Ih_l3ocGSBjmxfHM3XbHVRbhM7G1Bp7ZTirMzFSw8WGK4QuUInBc6SRz4mmhvdodJNh9QVRK5RRUx5_MKh7h5Pnf7wnC7Sg6QDwOxKhelcOvquE62k6RfZtUHGWt3BJJIg659aOG4gZLQgnE2Y2tk59httWWfo4xtctVtAsqyHAGbzLgHBll7efeH8qM4N32cU-rMV9z8K_vfGWc_M4koNNuNxx2MGglKkehnwp6MuchoA_f3FhYQUncmtrk4BIvR2DNd_624Xd85nFctD7uUVXDt4pkYHrImazniXEg7-1QlucSGMBxLPxgRwalMQKZf325u57E9bcRzRr7WJ5R9jCZ90EH_84upuezSqF8so78KhLsGQwaMta2xUuQLw8Akou3yfLHzkt8UfFb_mq8iPg7Dlel8HSv6ng_5Hu_ufyLXECb7s32zkgnlRCo6KXZftmg2CpBDqeaXZJP46P44g14C9kQHxe-ioTsiFOR52ZtQ1axeYk8a9RvCoJpI-jYPFQWxozU2oI4KN8U7GRNBVQQiE101ij27dHjOtUlq3wRvYmYFMzuK3gDaVNAfbLwQrMcLMMcd3AxD7lowswFbGSjAEs-vDFmTuIcoypBipVmu0qmSh3p3u-zPgeP-kmdLg140B_qBtAnaAx6ImDMCIb56x1i--XzwKcgSi1yikWmpuSMFycga-WEqXVh2u72ZPxolfSrtv60fSDiBUaunpDnsY0V2oSB_F4xmnZViDtk_QJyAcaEKAYkUqxffxXyPlf9oyPSIKHJUNem1OIeuCKSmL8CpBjax-MKK7E9emgXsSe3RlfYKYa3oF7BFW0EpFQMu3rKIOV8UCMcxz9__WHXZ94ntXx-c0y6qtrME9qAct5xMbIwyhNQHZfKSf5GYI-Mg9cEfS6eD3OYWRGD9MElj4ulMsOLHI47vLUWf7OqqSI17jI-90rkaXgU-QQ0_BspfuByVPiaOn80i0S4i57RUR-T48rLYJTbOQHrBqctiDNu6z1kmzOCc9zaANFlVbGZAQOOPoAju688kqiw6npbp2CL2FqUvCzOOhr0uY8P_EPSNQT45hcUoAjsvcoWONeJAW9XTSYLfFD22VCCEWGmjJix3Qc3AsLVyZW0t2sy9VRwfM-0f-6YtkTTnswr94AVia3dEwtVwW9_tRAdGIz95FLAJ57n4yoPpBWrd5oPoI5cxcT2IVpcrv_551_Mz9yUqxz8KCu8zVreB_EKrDbOh9OYW5bp_6vcth7T_VjLnyxTMU3y2Weje5XPeOXD85NZDaX5OsJmcNNKwsekDBvLvZjAe4ei-uX9Mv1wJAEq-o-mlX2_Cg9n4-qenI5GHq5j0oAz63eSTDeMVLqrW-HP0ioxHUw7XiWXg0Bxnh32DCitvijKHwF-S3bm7UnX0KxzV-nJMRIsm_Ve-UYzp2iHa10tEcKagJ0gjh8G6Xdigfp0fUtTDRiKlxyvuXkeTrnipYSr2_qESx05CwtUUBkKRpFTJwhueSwaRfebhF-dOZiPullmmRXMcz5AfvM1-Jt3Di16sy82zXtZR78UKo0u08kUz8L2ZP9MBKY6jzEK5uy7AlMD7z6eTMBFqXkjzRI6_2L-7_8AsqDx5IIMAAA=.eyJjbHVzdGVyVXJsIjoiaHR0cHM6Ly9XQUJJLVVTLU5PUlRILUNFTlRSQUwtcmVkaXJlY3QuYW5hbHlzaXMud2luZG93cy5uZXQiLCJlbWJlZEZlYXR1cmVzIjp7Im1vZGVybkVtYmVkIjpmYWxzZX19",
        "TokenId": "35e297ec-f916-4350-a7bc-d1a1f5ed0c0d",
        "Expiration": "/Date(1665602747000)/"
    },
    "MinutesToExpiration": 37,
    "DefaultPage": null,
    "MobileDefaultPage": null
}
Code language: JSON / JSON with Comments (json)
You’d notice that here we receive the EmbedUrl and the Token (EmbeToken.Token).
We store these values through lines 28-29.
Once we’ve initialized the required configurations, we can now embed Power BI. On line 45, we first set the factory services we’d need for the dashboard report. Once done, we target the element which we defined before on our DOM and inject the Power BI dashboard through lines 51-52.
Preview
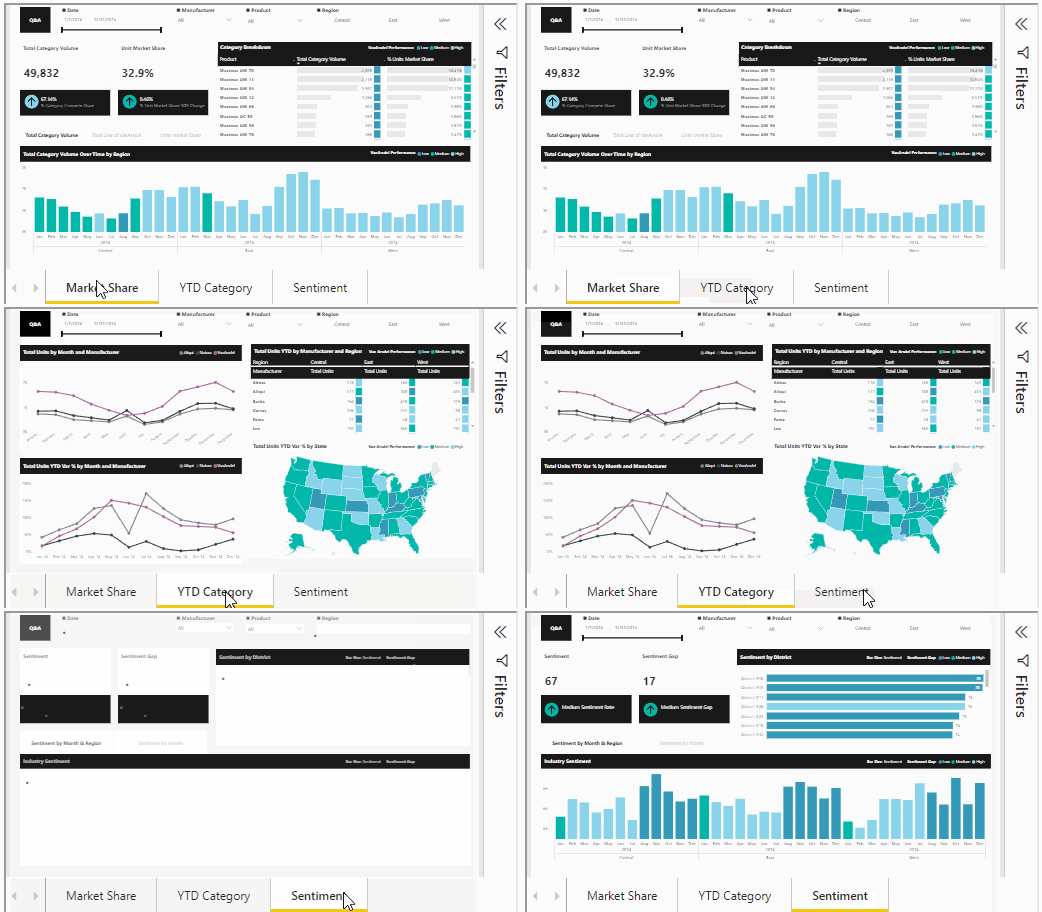
If everything works correctly, this is what we should see on our screen:

You can find a working version of the above code from my repo links below:
